Cyber lab in Proxmox VE
Project Overview
Purpose
This lab was built to create a controlled environment for practicing offensive and defensive cybersecurity techniques. My goal was to design and maintain infrastructure that I fully control, allowing me to build virtual machines, simulate real-world attack scenarios, and implement defensive monitoring strategies.
Rather than relying solely on external platforms, I wanted an environment where I could design custom attack paths, experiment freely, and understand both red-team and blue-team perspectives in depth.
The lab also gave me hands-on experience with physical networking, including network design, crimping Ethernet cables, configuring switches and routers, managing WiFi infrastructure, and integrating network-attached storage.
Problems It Addresses
This lab eliminates reliance on subscription-based training platforms such as Hack the Box and Try Hack Me by allowing me to design and deploy my own scenarios.
It enables:
- Realistic attack simulation
- Defensive configuration testing
- Log analysis and monitoring experiments
- Controlled malware testing within an isolated environment
By acting as both attacker and defender, I gain a deeper understanding of common vulnerabilities and mitigation strategies.
Core Technologies
The primary host is a dedicated PC running Proxmox Community Edition, powered by an Intel i7-4790S (8-core) CPU with 16GB RAM. The system boots from a 256GB SSD with an additional 2TB HDD for extended storage.
A separate NAS provides a 2TB ZFS-backed mirrored storage pool used for:
- VM backups
- Snapshots
- Disk images
- Lab archives
Internal virtual networking is configured within Proxmox to simulate segmented environments.
Originally, I planned to implement VLAN segmentation using 802.1Q tagging. However, the WiFi extender in use does not support VLAN tagging and strips 802.1Q headers. This constraint forced me to adapt the design and reinforced the importance of validating hardware capabilities before deployment — a practical lesson in infrastructure planning.
Remote access is provided via VPN, allowing secure off-site management.
Design Philosophy
This lab was designed with one principle: build something practical, scalable, and educational — not just something that looks good on a resume.
Every architectural decision prioritizes:
- Real-world applicability
- Security-first design
- Expandability
- Cost-efficiency
Security Posture
The lab follows the principle of least privilege wherever possible.
Access controls include:
- VPN-gated remote access
- Local network restrictions
- NAS access limited to internal network clients
While additional segmentation between the lab and home network is possible, current risk levels and usage patterns make the existing controls appropriate for the environment.
Security hardening is an ongoing process, and the lab evolves as I continue learning and applying best practices.
Skills Demonstrated
- Virtualization and hypervisor management
- Network design and troubleshooting
- Storage management (ZFS)
- VPN configuration
- Infrastructure hardening
- Red-team and blue-team simulation methodology
- Malware testing and reverse-engineering
Tools and Technologies Used
- Proxmox VE
- Virtual bridges for isolation
- VMs
- Kali, Windows, Ubuntu, REMnux, etc.
- Wazuh SIEM
- Airgapped malware testing environment
- REMnux VM
- Wireshark
- INETSIM
- Fake DNS
- Networking
- Windows VM
- Process Monitor
- ProcDot
- RegShot
- Powershell
- Noriben
- Process Hacker
- x64db
- REMnux VM
- Snapshots/Backups
- ZFS
What I Did
Network Topology
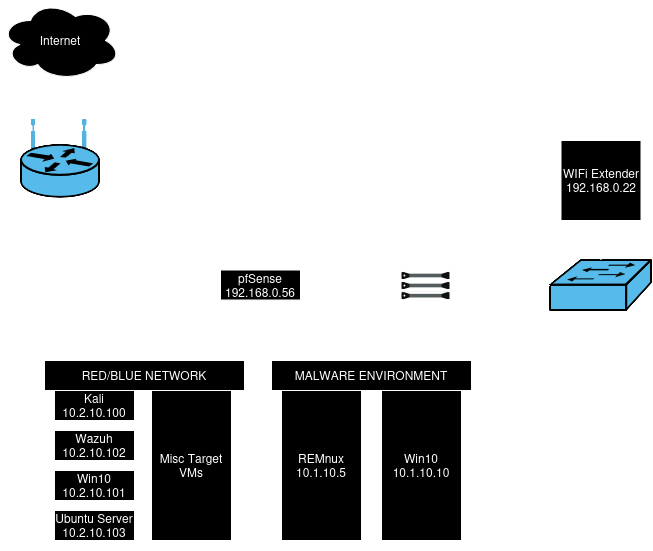
Starting out, I planned the basic network topology with the VM host, the NAS, a managed switch to connect them, and a raspberry pi functioning as a bridged router, and later implementing a WiFi extener instead of the raspberry pi.
Segmentation
There are only two segments on the lab:
- The main lab segment where the majority of the VMs reside
- The Malware segment where all things malware live, without access to additional network resources, or the internet
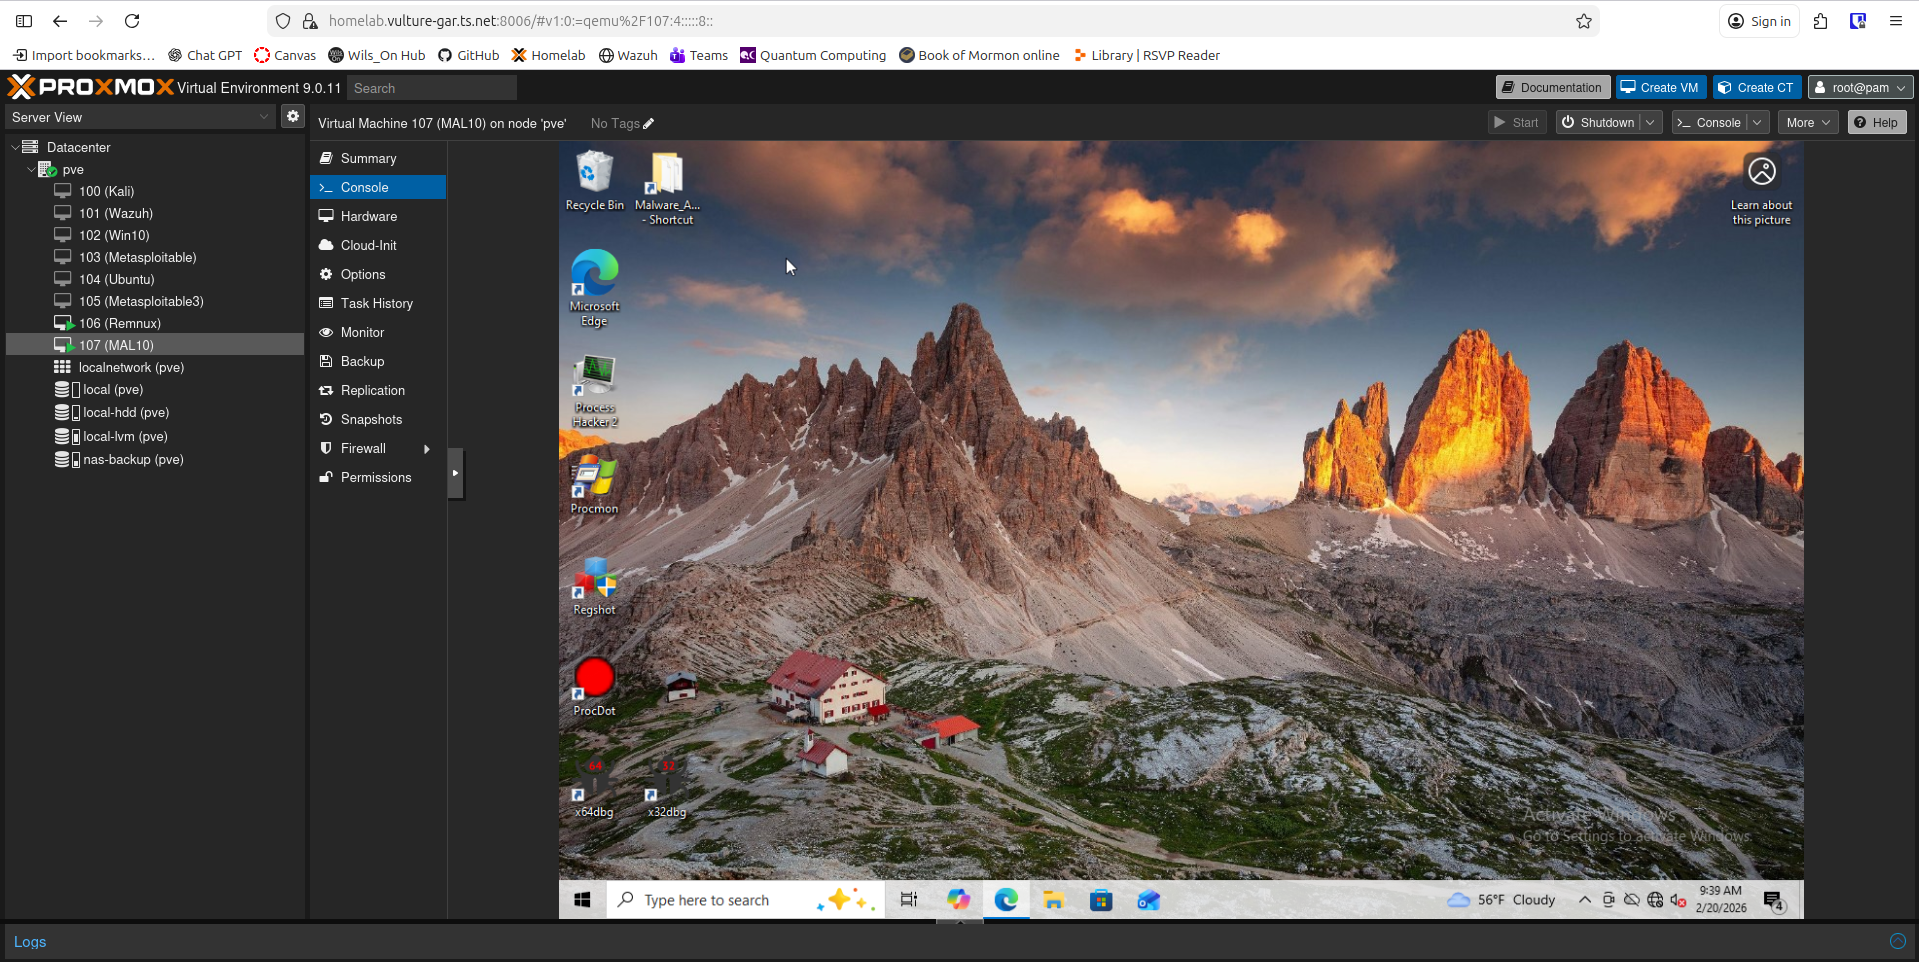
Tools on VMs
There are numerous tools on each VM, each with a role to play in cyber attacks and defenses. The Kali Linux VM is where the majority of my time is spent when doing any reconassaince, scanning, vulnerability testing, documenting, and exploitations. It is the main attack machine. There are a view choices currently available as victim machines:
- Windows 10 VM
- Clean Windows 10 install used for benchmark testing
- Runs a Wazuh agent for SIEM integration, scanning and reporting
- Ubuntu VM
- Used to configure specific services and run them for targeted practice with scanning and exploitation
- Can be customized as needed
- Runs a Wazuh agent for SIEM integration, scanning and reporting
- Metasploitable (Linux)
- A purpose built Linux machine running numerous vulnerable services
- Intended to be vulnerable and easily exploitable
- Used for scanning and exploitation practice
- Metasploitable 3 (Linux)
- Similar to Metasploitable, but with more and differing services
- Wazuh
- Collects and compiles data from each client’s logs and reports security-related events and classifying them by severity based on type of activity and confidence in the threat
- Dashboards can be built to visualize the data
- Endpoint detection and resopnse (EDR), meaning it can monitor processes, registry activity, logs, and auto block IPs (through a firewall), kill processes, remove malicious files, and even run custom response scripts
- Features compliance reporting
Challenges and Solutions
Providing Network Connectivity
As mentioned previously, I planned to use a raspberry pi to act as a router bridge to provide network connectivity to my lab. The problem that kept coming up was a kernel panic with it running as a router bridge. I decided to go a different route and try forwarding traffic from the wireless interface to the wired interface. Even though this new approach worked better, it still did not reliably function. I scrapped the idea altogether and implemented a WiFi extender to provide network connection to the switch.
Another problem in the realm of network connectivity were the ethernet cables being implemented. I used Cat 6 cabling to provide 10Gb speeds between the NAS and the VM host, and to not have any bottlenecks due to cabling. The problem was that when crimping the cables, some wires would shift and be punctured by 2 pins at once, shorting the connection and rendering the speed to be much slower without the proper channeling available. To overcome this, I kept splicing and crimping small sections to get the hang of it, and finally made enough cables that were crimped properly.
Network Segmentation and VLANs
Also mentioned previously was the intent to implement VLANs to segment the network further and route traffic appropriately. After building the full network topology came time to implement VLANs. I started out by using 802.1Q tagging by specifying port numbers on the managed switch, yet it would not work and would not send traffic to the correct VLAN. After researching and troubleshooting, the conclusion was made that the the 4-byte 802.1Q tag was being stripped by the VLAN-unaware WiFi extender before the traffic even reached the router.
After the failure to implement VLAN tagging, I decided to harden the lab in other ways. The lab was originally going to be exposed to the open internet as to provide maximum availability, but instead, a VPN-only connection was integrated to shrink the pool of devices that could access the lab, and therefore reduce the worry for any unauthorized access to the lab, or other network resources. I am planning, in the future, to replace the WiFi extender with a VLAN aware one to implement tagging and increase security, but for the time being, this configuration suits the needs of the lab, network, and risks.